

Making a scalable chatting app to learn WebSockets
Using Vue, WebSockets, Redis & Python


Table of contents
Introduction
TL;DR: Made a chatting app hosted at Chatly because I wanted to learn WebSockets.
Hello! I recently had some free time and did something I haven't done in a while... built a personal project to completion! While this started as quickly learning WebSockets, it soon became a full-blown project of figuring out how to use WebSockets with serverless containers, re-learning Redis, and creating a full-stack web app using NuxtJS. In this article, I'll go through the process of how I built Chatly and what I learned along the way!
WebSockets
What are Websockets?
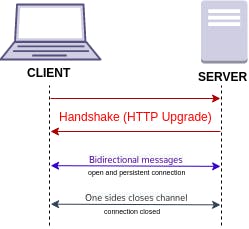
WebSockets is a protocol to establish a two-way connection between a client and a browser so messages can be sent back and forth. Additionally, either the client (closing the website) or the server (idle session) can close the connection at any point in time. This works nicely for a chat because users can send information from their browser (client) to a server which is then sent from the server to everyone else's browser, therefore making a simple chatroom.
Learning WebSockets
Because I wanted to learn as much as possible, I decided to learn barebones WebSockets compared to Socket.io (which I'm still not sure was the best idea, lol). Thankfully, my favorite Python web framework, FastAPI, supports WebSockets so I was in luck! I set up my WebSockets logic, made a simple chat page to test it, and deployed it to Google's Cloud Run (a serverless container). And here was the original site,

Super easy and everything was done! Or was it...
Issues with WebSockets
So it wasn't as easy as that, I completely ignored one glaring issue with my architecture. As Cloud Run is serverless, meaning new instances of the app would spring up with increased usage, it meant that when a user was put onto one of those new instances, they'd actually be in a separate chat (WebSocket server) from all the other users. So instead of it working as a general chatroom, it was a pseudo-random matchmaking chat room? Whatever it was, it didn't work and I wanted to fix it. For that to work, we need a centralized system that could synchronize all the messages being sent to various WebSocket servers. So here comes our next technology... Redis.
Redis
What is Redis?
As I've mentioned in previous articles, I absolutely love Redis. It's incredibly well-built, well-maintained, and lightning-fast. At the core of it, it's an in-memory database that can store simple data structures, but it's been built to be much more. In particular, I would need to use their PubSub feature.
What is PubSub?
A publish-subscription pattern (a.k.a PubSub), is a way to communicate information across servers in a scalable way. It's similar to a message queue, with the main difference being the coupling between sender and receiver. With PubSub, you simply subscribe to a topic and then you read all information published on that topic. Sounds a lot like a chat room right?
Lets look at a quick example of how it works in Redis. For context I've installed and launched Redis and now am in the terminal.
Let's subscribe to the general channel (it's created if it doesn't already exist). We see that it's now waiting to receive messages (with the first one being it's own subscription).
127.0.0.1:6379> SUBSCRIBE general
Reading messages... (press Ctrl-C to quit)
1) "subscribe"
2) "general"
3) (integer) 1
Now in another window, we'll publish a message and see what happens!
127.0.0.1:6379> PUBLISH foo test
(integer) 1
And the original window,
1) "message"
2) "general"
3) "test"
So we see with this pattern, we can have people communicate across multiple servers, if we can get the messages published (and read from) Redis. So lets do it!
Adding PubSub to my app
So now I needed to add Redis' PubSub functionality to my app. This was actually way easier than I expected. I used the official Redis Python Client, now with an asynchronous version so it's very performant. To do so, every user subscribes to the chat's topic when the WebSocket is created. Then, when each user joins (and leaves) the chat, it publishes that to the topic. Additionally, each message sent over WebSocket is published to the topic. This allows for all the various servers powering the WebSockets, to be synced with the same messages!
After all that, the code was only ~50 lines for the core logic of it all,
So now you're thinking, "he must be done, he did everything wanted". Not quite yet, now that the chat worked really well and was quick, I wanted to make it nice and usable. So now we introduced ...🥁🥁🥁... NuxtJS.
NuxtJS
What is Nuxt?
Stated as the "Intuitive Vue Framework" it's a framework for implementing Vue (similar to React) in an easy-to-use way! While this is a simple app and this may have been overkill, I started to think I'd slowly add features to it so thought it was worth the original setup (and am I glad I did!)
Note: I wasn't daring enough to use the Nuxt3 release candidate so this uses Nuxt2 (and Vue2).
What I did with Nuxt
So even though this started as simply building out a quick UI for the functionality, I quickly found myself adding other things like Authentication, separate chat rooms, mobile-friendly responsiveness, and much more. While I won't go over all this functionality as it was honestly more coding than all the WebSockets and Redis put together, I'll mention the main things I did and what I used.
Setup
I used the nuxt-create-app to create my project which made it super easy. I was able to select Vuetify as my component library, choose between static and server-side rendering, and much more.
Authentication
For authentication, I used nuxt-auth with Firebase to add email/password auth. While I want to eventually add federated login ("Sign in with Google"), it was a little too difficult to start with so I decided to add it later. I chose Firebase because it was already in Google's ecosystem and I have a tendency to avoid having multiple accounts/systems for a project if it's not necessary. As for nuxt-auth, it's quite fantastic! I was able to set up the auth pattern used by Firebase easily, add things like "Remember Me" to log in, and add guards to certain screens (can't access index without being authenticated, and can't visit login/signup when authenticated) in a few simple lines of code.
Nicer components and responsiveness
By using Vuetify, I was able to use the expansive component library to make the website way nicer and easier to use. Additionally, it ties in nicely with the responsiveness of Vue to make the app feel "alive". As for responsiveness, I was able to use their display breakpoints to have the app look nice on desktop, tablet, and mobile within an hour.
Although I was close to finishing, I wanted two last things. Separate chatrooms, and password protection for those rooms. For that I needed to add a database, and I chose Firestore.
Firestore
What is firestore?
Firestore is a NoSQL document database. I like to think of it as a database of JSONs that are searchable and filterable. While it doesn't have all the power of SQL, we don't have much relation in this project so I didn't feel the need for the code complexity of working with SQL and the cost.
What I did with Firestore
While I initially added Firestore just to have separate chatrooms and some simple metadata about them, I ended up also using it for WebSocket authentication on private rooms.
Separate rooms
For the separate rooms, I simply added some CRUD operations to the API so that rooms could be created, read, and listed. This allows for users to create rooms and then all other users to access and see them.
Private rooms
While creating rooms was easy, securing them turned out to be a challenge. I assumed I'd be able to use a bearer token for WebSockets but it turns out that isn't widely supported so I had to find another solution. I ended up settling on this StackOverflow answer about using a token-based system which I had to build out.
Looking forward
And.... we're finally done! It was quite the experience to create something so new for myself and learn a lot of things along the way. Additionally, there's a lot I want to do with this so it'll be fun to constantly learn new things and add functionality.
As for infrastructure I want to,
- Look at switching over to Google's Cloud Pub/Sub, as managing a Redis database can be a pain and be a scalability bottleneck.
- Look at moving to Vercel for the frontend server as they may have quicker wake times (currently on Cloud Run)
As for features, I have a full list on the GitHub org.
Summary
As always, thanks for reading! Feel free to leave any comments with questions or maybe feature requests!
As for more reading about app scalability, check out some of my previous articles,